INTERNET SERVICES |
INTERNET SERVICES |
| Windows 95/98 PPP Setup Instructions
What You Need to Get Started: A PPP account from Northwest Advantage, your PPP login name, and your PPP password Step 1: Verify that Dial-up Networking is Installed Press the Step 2: Verify that the Dial-up Adapter and TCP/IP Protocol are Installed Press the 
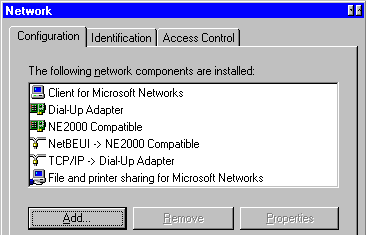
Make sure the Configuration tab is selected. Both Dial-Up Adapter and TCP/IP should be present (like in the picture). If so, then you're ready to proceed to step 3. To add the Dial-Up Adapter, click the Add button, double-click Adapter, then scroll down the list until you can select Microsoft. Choose the Dial-Up Adapter and click OK. If you need to install TCP/IP, click the Add… button, double-click Protocol, then select Microsoft. Finally select TCP/IP, and click OK. Your Network dialog box should now contain both Dial-Up Adapter and TCP/IP. Select the adapter, click Properties, then Bindings. Make sure the TCP/IP box is checked. You're now ready to proceed.
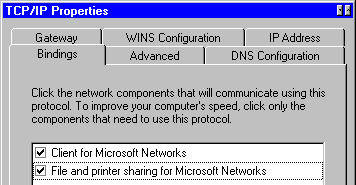
Step 3: Configure your TCP/IP Protocol for Dynamic IP Now that the driver is installed, you need to configure it so it will work with Windows 95. Go to the Control Panel and double-click the Network icon. Click TCP/IP protocol, then click the Properties button. The TCP/IP Properties dialog box opens. There are several items that will need to be configured in this area. IP Addresses: Select the Obtain an IP address automatically option.
WINS Configuration: Select the Disable WINS Resolution option for now, you can enable it later if you want to run peer to peer networking.
Gateway: Leave this field blank. Bindings: If Client for Microsoft Networks does not appear here, then you probably do not have it installed. If you decide to install it, you can go back to Step 2, but add the Client/Microsoft Client for Microsoft Networks instead of the Adapter/Protocol. If it is already installed, then by default the Client for Microsoft Networks option is checked, which is fine. Also, leave the default settings for the Advanced option tab, as no changes are needed. 
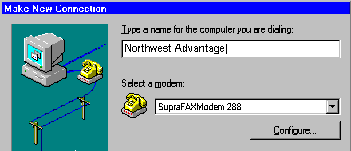
DNS Configuration: Select Enable DNS option, then enter your PPP login name in the Host box. This is the one that typically starts with a capital "P" and is listed on the front cover of your Internet Setup Guide. In the Domain text box, type ieway.com. Leave the DNS Server Search Order section blank, as well as the Domain Suffix Search Order section. When you are done setting these options, click OK , then click the OK button in the Network dialog box. Windows 95 prompts you to reboot. Click Yes. You're almost done! Step 4: Setting Up the Connection Icon Open up My Computer from the desktop and double-click the Dial-Up Networking Double-click the Make New Connection 
Step 5: Setting the Dial-Up Properties Select your newly-created connection icon, press the right mouse button and choose Properties Click the Server Type button. The Server Types dialog box opens. 
In the Type of Dial-Up Server section, click the down arrow to choose the PPP server type. Make sure that Log on to network in the Advanced options: section is not checked (this makes for an easier initial install, you can check it off later when you want to try some of the more advanced peer to peer capabilities of Windows 95). Also, make sure that TCP/IP in the Allowed network protocols: section is checked, then click OK . Click the OK button in the remaining dialog box, and you're almost ready to dial! Step 6: Configure Dial-Up Networking to Automatically Redial a Busy Number Z Tech Computers, Inc.strives to never have busy signals. However, in the event that you might get one on a rare occasion... Select Connections from the Dial-Up Networking folder, then Settings. From here, you can choose the number of times you would like your dial-up sessions to re-attempt connection in case you encounter a busy signal. Should you encounter busy signals on a regular basis, try one of our other phone numbers.
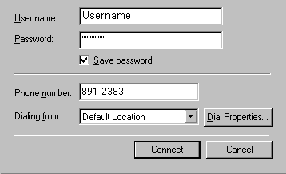
Step 7: Dialing in and Getting Connected Double-click your ZTC

You did it! You have configured your dial-up communication software and connected to Northwest Advantage. Next, look at the second insert that was included with your Internet Setup Guide. It walks you through downloading the most recent version of Netscape, installing the program and then shows you how to connect to Northwest Advantage's STARTUP Web site so that you can continue on with your Internet software configurations and learn about the Internet. Congratulations. You are on your way to reaching a global community that is out of this world.
|
| This site developed and maintained by Alex Renner © Z-Tech 2001 |